FUEL PUMP UNIT REMOVAL/INSTALLATION [SKYACTIV-G 2.0]
WARNING:
Highly pressurized fuel may spray out if the fuel line is cut. Due to the following dangers occurring with a fuel spray, always complete the “Fuel Line Safety Procedure” to prevent the fuel from spraying.
Fuel may cause irritation if it comes in contact with skin and eyes.
If fuel ignites and causes a fire, it may lead to serious injury or death, and damage to property and facilities.
A person charged with static electricity could cause a fire or explosion, resulting in death or serious injury. Before draining fuel, make sure to discharge static electricity by touching the vehicle body.
CAUTION:
Disconnecting/connecting the quick release connector without cleaning it may cause damage to the fuel pipe and quick release connector. Always clean the quick release connector joint area before disconnecting/connecting using a cloth or soft brush, and make sure that it is free of foreign material.
1. Complete the “BEFORE SERVICE PRECAUTION”. (See BEFORE SERVICE PRECAUTION [SKYACTIV-G 2.0].)
2. If the fuel gauge level indicates 15/16 or more, refer to the “FUEL DRAINING PROCEDURE” and drain the fuel. (See FUEL DRAINING PROCEDURE [SKYACTIV-G 2.0].)
3. Disconnect the negative battery cable. (See NEGATIVE BATTERY CABLE DISCONNECTION/CONNECTION.)
4. Remove the following parts:a. Seat (LH) (See SEAT REMOVAL/INSTALLATION.)b. Selector lever knob (AT) (See AUTOMATIC TRANSMISSION SHIFT MECHANISM REMOVAL/INSTALLATION.)c. Shift lever knob (MT) (See TRANSMISSION REMOVAL/INSTALLATION [M66M-D].)d. Shift panel compartment (See SHIFT PANEL REMOVAL/INSTALLATION.)e. Upper panel (See UPPER PANEL REMOVAL/INSTALLATION.)f. Parking brake lever boot panel (See PARKING BRAKE LEVER BOOT PANEL REMOVAL/INSTALLATION.)g. Rear console (See REAR CONSOLE REMOVAL/INSTALLATION.)h. Scuff plate (See SCUFF PLATE REMOVAL/INSTALLATION.)i. Tire house trim (See TIRE HOUSE TRIM REMOVAL/INSTALLATION.)j. Seat back bar garnish (See SEAT BACK BAR GARNISH REMOVAL/INSTALLATION.)k. Quarter trim (See QUARTER TRIM REMOVAL/INSTALLATION.)l. Wind blocker (See WIND BLOCKER REMOVAL/INSTALLATION.)m. Roof hook lever (See ROOF HOOK REMOVAL/INSTALLATION.)n. Back trim (See BACK TRIM REMOVAL/INSTALLATION.)o. CD player, CD player bracket (with CD player) (See CD PLAYER REMOVAL/INSTALLATION.)p. Side shelf (LH) (See SIDE SHELF REMOVAL/INSTALLATION.)q. Rear package trim (See REAR PACKAGE TRIM REMOVAL/INSTALLATION.)
5. Remove the service hole cover.

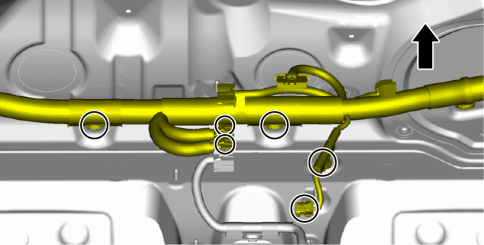
6. Disconnect the connector and harness as shown in the figure.
7. Remove in the order indicated in the table.

1
Fuel pump unit connector
2
Quick release connector
(See QUICK RELEASE CONNECTOR REMOVAL/INSTALLATION [SKYACTIV-G 2.0].)
3
Set plate
4
Fuel pump unit
5
Packing
8. Install in the reverse order of removal.
9. Complete the “AFTER SERVICE PRECAUTION”. (See AFTER SERVICE PRECAUTION [SKYACTIV-G 2.0].)< Previous Next >