SEAT BELT INSPECTION
NOTE:
With standard deployment air bag control system
The specifications for each seat belt are as indicated in the table.
| Seat belt |
Type |
Function |
| Driver’s side |
Three-point |
|
| Passenger’ side |
Three-point |
|
| Seat belt |
Type |
Function |
| Driver’s side |
Three-point |
|
| Passenger’ side |
Three-point |
|
Belt
1. Verify that the seat belt is installed properly with no twists or kinks.
2. Verify that there is no damage to the seat belt and no deformation of the metal fittings.
If there is any malfunction, replace the seat belt. (See SEAT BELT REMOVAL/INSTALLATION.)
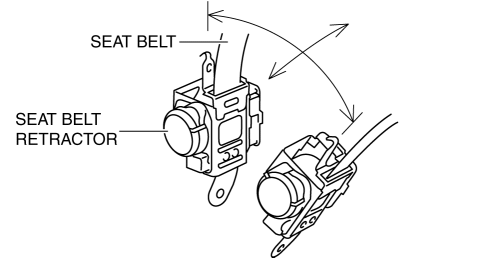
ELR (Emergency Locking Retractor)
1. Verify that the seat belt can be pulled out smoothly, and that it retracts smoothly.

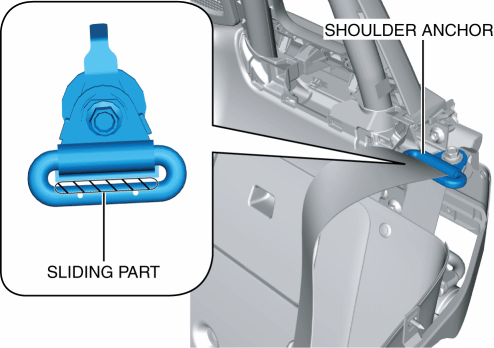
If there is any malfunction, clean the ring part of the shoulder anchor. (See Shoulder Anchor Cleaning.)
If the malfunction is not resolved even after the ring part of the shoulder anchor is cleaned, replace the seat belt. (See SEAT BELT REMOVAL/INSTALLATION.)
2. Verify that the seat belt retractor locks when the seat belt is pulled quickly.
If there is any malfunction, replace the seat belt. (See SEAT BELT REMOVAL/INSTALLATION.)
3. Remove the seat belt. (See SEAT BELT REMOVAL/INSTALLATION.)
4. While pulling the seat belt out, verify that the seat belt does not lock when the seat belt retractor is tilted slowly up to 15° from the mounted position and locks when the seat belt retractor is tilted 40° or more.
If there is any malfunction, replace the seat belt. (See SEAT BELT REMOVAL/INSTALLATION.)
Load Limiter Retractor
WARNING:
When the load limiter operates, the seat belt and anchor rub against each other strongly leaving wear tracks. If the seat belt is used in this state, the seat belt will not function at its full capability and there is the possibility of serious injury to passengers. Always replace the seat belt once the load limiter operates.
1. If the vehicle has been subjected to a shock in an accident, pull the seat belt from the seat belt retractor and confirm that there are no wear tracks (the load limiter has not operated) by visually inspecting and feeling the seat belt.

If there is any malfunction, replace the seat belt. (See SEAT BELT REMOVAL/INSTALLATION.)
ALR (Automatic Locking Retractor)
1. Pull the seat belt out fully to change the lock mode from ELR to ALR.
2. Verify that the seat belt retractor makes a clicking sound as the seat belt slowly retracts. If no sound is heard, the lock mode has not changed to ALR. If necessary, repeat Step 1.
If there is any malfunction, replace the seat belt. (See SEAT BELT REMOVAL/INSTALLATION.)
3. Verify that the seat belt retractor locks when pulled.
If there is any malfunction, replace the seat belt. (See SEAT BELT REMOVAL/INSTALLATION.)
4. Verify that the lock mode changes to ELR when the seat belt is fully pulled out.
If there is any malfunction, replace the seat belt. (See SEAT BELT REMOVAL/INSTALLATION.)
Shoulder Anchor Cleaning
1. Remove the seat back bar garnish (front). (See SEAT BACK BAR LOWER GARNISH REMOVAL/INSTALLATION.)
2. Remove the quarter trim. (See QUARTER TRIM REMOVAL/INSTALLATION.)
3. Wipe off any dirt on the sliding part of the shoulder anchor and seat belt using a soft cloth dampened with mild detergent diluted in water (approx. 5%).
4. Install the removed parts.< Previous Next >