REAR WINDOW DEFOGGER SYSTEM INSPECTION
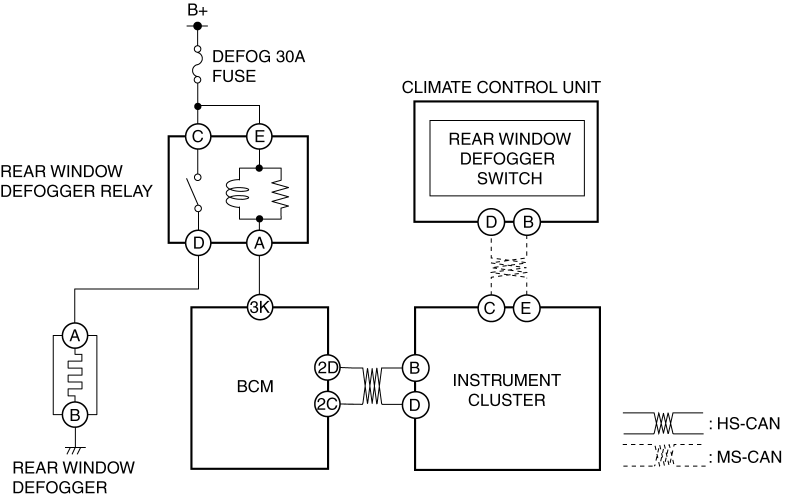
System wiring diagram
Inspection Procedure
| Step |
Inspection |
Action |
|
| 1 |
|
Yes |
Repair the malfunctioning location according to the applicable DTC troubleshooting. |
| No |
Go to the next step. |
||
| 2 |
|
Yes |
Go to Step 5. |
| No |
Go to the next step. |
||
| 3 |
|
Yes |
Go to the next step. |
| No |
Replace the climate control unit, then go to Step 10. (See CLIMATE CONTROL UNIT REMOVAL/INSTALLATION [FULL-AUTO AIR CONDITIONER].) (See CLIMATE CONTROL UNIT REMOVAL/INSTALLATION [MANUAL AIR CONDITIONER].) |
||
| 4 |
|
Yes |
NOTE:
Replace the BCM, then go to Step 10. |
| No |
Replace the climate control unit, then go to Step 10. (See CLIMATE CONTROL UNIT REMOVAL/INSTALLATION [FULL-AUTO AIR CONDITIONER].) (See CLIMATE CONTROL UNIT REMOVAL/INSTALLATION [MANUAL AIR CONDITIONER].) |
||
| 5 |
|
Yes |
Go to the next step. |
| No |
Replace the rear window defogger relay, then go to Step 10. (See RELAY LOCATION.) |
||
| 6 |
|
Yes |
Go to the next step. |
| No |
Inspect the DEFOG 30 A fuse.
Go to Step 10. |
||
| 7 |
|
Yes |
Go to the next step. |
| No |
Refer to the wiring diagram and verify if there is a common connector between rear window defogger relay terminals D and rear window defogger terminal 1A.
After repair procedure, go to Step 10. |
||
| 8 |
|
Yes |
Go to the next step. |
| No |
Repair the rear window defogger, then go to Step 10. (See REAR WINDOW DEFOGGER REPAIR.) |
||
| 9 |
|
Yes |
Replace the BCM, then go to the next step. |
| No |
Refer to the wiring diagram and verify if there is a common connector between BCM terminal 3K and rear window defogger relay terminal A.
After repair, go to the next step. |
||
| 10 |
|
Yes |
Explain the contents of the servicing to the customer. |
| No |
If the malfunction has not been resolved, repeat the inspection from Step 1. |
||
