INSTRUMENT CLUSTER INSPECTION
Speedometer Inspection
Using a speedometer tester
CAUTION:
When only the front or the rear wheels are driven using a speedometer tester, the DSC HU/CM may determine that the vehicle speed signal is in error and the engine cannot be stopped by the normal operation. If the engine cannot be stopped, perform an emergency engine stop operation. (See SERVICE CAUTIONS.)
1. Adjust the tire pressure to the specification. (See WHEEL AND TIRE SPECIFICATION.)
2. Using a speedometer tester, verify that the values are as indicated in the table. km/hmph
Speedometer indication (km/h)
Speedometer tester indication (km/h)
20
17.57—22.43
40
37.67—42.33
60
57.57—62.43
80
77.47—82.53
100
97.12—102.88
120
116.66—123.34
140
136.37—143.63
160
156.37—163.63
180
176.37—183.63
200
196.20—203.80
220
215.40—224.60
Speedometer indication (mph)
Speedometer tester indication (mph)
10
9.07—10.92
20
19.10—20.89
30
29.07—30.92
40
39.03—40.95
50
48.98—51.00
60
58.85—61.13
70
68.693—71.277
80
78.579—81.387
90
88.577—91.385
100
98.58—101.38
110
108.58—111.38
120
118.51—121.44
130
128.41—131.53
140
138.41—141.53
If not as indicated in the table, perform the DTC inspection for the PCM and DSC HU/CM, and inspect the related wiring harnesses. (See ON-BOARD DIAGNOSTIC TEST [PCM (SKYACTIV-G 2.0)].) (See DTC INSPECTION [DSC HU/CM].)
If the PCM, DSC HU/CM, and related wiring harnesses are normal, replace the instrument cluster. (See INSTRUMENT CLUSTER REMOVAL/INSTALLATION.)
Using the M-MDS
1. Connect the M-MDS to the DLC-2.
2. After vehicle identification, select the following from the M-MDS initialization screen.a. Select “DataLogger”.b. Select “Modules”.c. Select “IC”.
3. Using the simulation function SPEEDOMTR, verify that the values are as indicated in the table.
M-MDS display
Speedometer display
Off
Speedometer needle moves to approx. 0 km/h {0 mph}.
60 km/h
Speedometer needle moves to approx. 57—63 km/h {36—39 mph}.
120 km/h
Speedometer needle moves to approx. 116—124 km/h {72.1—77.0 mph}.
If not as indicated in the table, replace the instrument cluster. (See INSTRUMENT CLUSTER REMOVAL/INSTALLATION.)
Tachometer Inspection
CAUTION:
If the engine speed exceeds the allowable range, the engine could be damaged. Therefore, when inspecting the tachometer, do not allow the engine speed to exceed the allowable range indicated on the tachometer.
1. Connect the M-MDS to the DLC-2.
2. After vehicle identification, select the following from the M-MDS initialization screen.a. Select “DataLogger”.b. Select “Modules”.c. Select “IC”.
3. Using the simulation function TACHOMTR, verify that the values are as indicated in the table.
M-MDS display
Tachometer display
Off
Tachometer needle moves to 0 rpm.
3000 RPM
Tachometer needle moves to approx. 3,050 rpm.
6000 RPM
Tachometer needle moves to approx. 6,100 rpm.
If not as indicated in the table, replace the instrument cluster. (See INSTRUMENT CLUSTER REMOVAL/INSTALLATION.)
LCD Inspection
1. Connect the M-MDS to the DLC-2.
2. After vehicle identification, select the following from the M-MDS initialization screen.a. Select “DataLogger”.b. Select “Modules”.c. Select “IC”.
3. Using the simulation function item LCD_SEG, verify that the LDC displays as shown in the following figure.
If the LCD display is not as shown in the figure, replace the instrument cluster. (See INSTRUMENT CLUSTER REMOVAL/INSTALLATION.)

Warning/Indicator Light Illumination Inspection
1. Connect the M-MDS to the DLC-2.
2. After vehicle identification, select the following from the M-MDS initialization screen.a. Select “DataLogger”.b. Select “Modules”.c. Select “IC”.
3. Using the simulation function WL+IL, verify that the warning/indicator lights in the following table are illuminated.
If any of the warning/indicator lights are not displayed, replace the instrument cluster. (See INSTRUMENT CLUSTER REMOVAL/INSTALLATION.)
×: Applicable—: Not applicable
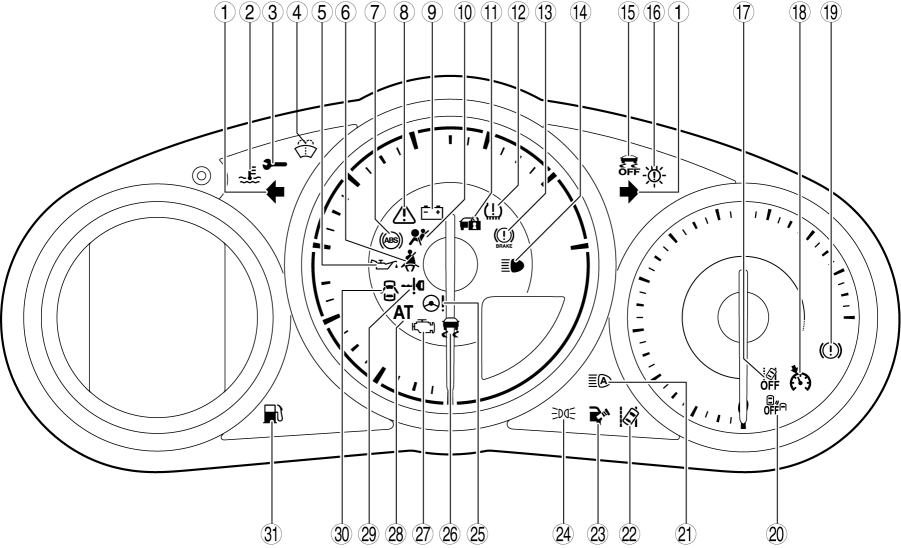
No.
Warning light/Indicator light
Name
Message is displayed in center display when warning/indicator light turns on/flashes
Comment
Warning/indicator light turned on when ignition is switched ON (engine off or on)
1

Turn signal/hazard warning indicator lights
—
—
—
2

Low engine coolant temperature indicator light (blue)/high engine coolant temperature warning light (red)
×
—
×
3

Wrench indicator light
—
—
×
4

Low washer fluid level warning light
×
With washer fluid-level sensor
—
5

Engine oil warning light
×
—
×
6

Seat belt warning light
—
—
—
7

ABS warning light
×
—
×
8

Master warning light
×
—
×
9

Charging system warning light
—
—
×
10

Air bag/seat belt pretensioner system warning light
×
—
×
11

Security indicator light
—
—
×
12

Tire pressure monitoring system warning light
×
With TPMS
×
13

Brake system warning light
×
—
×
14

Headlight high-beam indicator light
—
—
—
15

DSC OFF indicator light
—
—
×
16

LED headlight warning light
×
—
×
17

LDWS OFF indicator light
—
With lane departure warning system (LDWS)
×
18

Cruise main indicator light (amber)/cruise set indicator light (green)
—
With cruise control system
—
19

Electric vacuum pump warning light
—
—
×
20

Blind spot monitoring (BSM) OFF indicator light
—
With blind spot monitoring (BSM) system
×
21

HBC indicator light (green)/HBC warning light (amber)
×
With high beam control (HBC) system
×
22

LDWS warning light
×
With lane departure warning system (LDWS)
×
23

Check fuel cap warning light
×
—
×
24

Lights-on indicator light
—
—
—
25

Power steering malfunction indicator light
×
—
×
26

TCS/DSC indicator light
×
—
×
27

Check engine light
×
—
×
28

Automatic transmission warning light
×
AT
×
29

KEY warning light (red)/KEY indicator light (green)
×
—
×
30

Door-ajar warning light
—
—
—
31

Low fuel warning light
×
—
—
Alarm Inspection
1. Connect the M-MDS to the DLC-2.
2. After vehicle identification, select the following from the M-MDS initialization screen.a. Select “DataLogger”.b. Select “Modules”.c. Select “IC”.
3. Using the simulation function ALARM, verify that the buzzer sounds.< Previous Next >
If the buzzer does not sound, replace the instrument cluster. (See INSTRUMENT CLUSTER REMOVAL/INSTALLATION.)