INDICATOR UNIT INSPECTION
Terminal Voltage Inspection
1. Disconnect the negative battery cable. (See NEGATIVE BATTERY CABLE DISCONNECTION/CONNECTION.)
2. Remove the following parts:a. Selector lever knob (AT) (See AUTOMATIC TRANSMISSION SHIFT MECHANISM REMOVAL/INSTALLATION.)b. Shift lever knob (MT)c. Shift panel component (See SHIFT PANEL REMOVAL/INSTALLATION.)d. Upper panel (See UPPER PANEL REMOVAL/INSTALLATION.)e. Parking brake lever boot panel (See PARKING BRAKE LEVER BOOT PANEL REMOVAL/INSTALLATION.)f. Rear console (See REAR CONSOLE REMOVAL/INSTALLATION.)g. Front console panel (See FRONT CONSOLE PANEL REMOVAL/INSTALLATION.)
3. Remove the indicator unit with the connector still connected. (See INDICATOR UNIT REMOVAL/INSTALLATION.)
4. Connect the negative battery cable. (See NEGATIVE BATTERY CABLE DISCONNECTION/CONNECTION.)
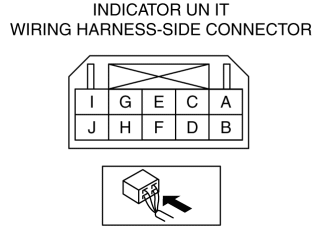
5. Verify that the voltages of each of the terminals are as indicated in the terminal voltage table (reference).
If the voltage is not as specified in the terminal voltage table (reference), inspect the parts under Inspection item(s).
If the system does not work normally even though the inspection items or related wiring harnesses do not have any malfunction, replace the indicator unit. (See INDICATOR UNIT REMOVAL/INSTALLATION.)
Terminal Voltage Table (Reference)
—: Not applicable

Terminal
Signal name
Connected to
Measurement conditions
Voltage (V)
Inspection item(s)
A
Power supply (IG1)
IG1 relay
Ignition switch ON (engine off or on)
B+
METER1 10 A fuse
IG1 relay
Related wiring harness
Ignition switch off or ACC
1.0 or less
B
Power supply
INTERIOR 15 A fuse
ROOM 25 A fuse
Under any condition
B+
INTERIOR 15 A fuse
ROOM 25 A fuse
Battery
Related wiring harness
C
—
—
—
—
—
D*1
Seat warmer switch signal
Seat warmer control unit
Because this terminal is for communication, determination using terminal voltage inspection is not possible.
E*2
Passenger air bag deactivation (PAD) ON indicator
Instrument cluster
Ignition switched ON (engine off)
Turn PAD switch on (PAD ON indicator light turns off) and light switch at OFF position
1.0 or less
Instrument cluster
Related wiring harness
Turn PAD switch on (PAD ON indicator light turns off) and light switch at TNS (Parking Lights) position
Approx. 11
Turn PAD switch off (PAD ON indicator light turns on)
Approx. 4
F
Ground
Body ground
Under any condition
1.0 or less
Body ground
Related wiring harness
G
Instrument cluster signal
Instrument cluster
Because this terminal is for communication, determination using terminal voltage inspection is not possible.
H
—
—
—
—
—
I
—
—
—
—
—
J*2
Passenger air bag deactivation (PAD) OFF indicator
Instrument cluster
Ignition switched ON (engine off)
Turn PAD switch on, approx. 60 s (during PAD OFF indicator illumination)
Approx. 11
Instrument cluster
Related wiring harness
Turn PAD switch off (PAD OFF indicator light turns off) and light switch at OFF position
Approx. 4
Turn PAD switch off (PAD OFF indicator light turns off) and light switch at TNS (Parking Lights) position
1.0 or less
- *1
- With seat warmer
- *2
- With passenger air bag deactivation (PAD) system
LED Illumination Inspection
When using M-MDS
1. Connect the M-MDS to the DLC-2.
2. After the vehicle is identified, select the following items from the initialization screen of the M-MDS.a. Select “DataLogger”.b. Select “Modules”.c. Select “IC”.
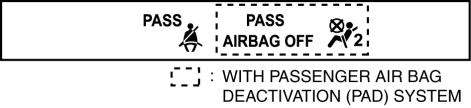
3. Using the simulation function item LCD_SEG, verify that the warning/indicator lights are displayed as shown in the following figure.
If the warning/indicator lights are not displayed as shown in the figure, replace the indicator unit. (See INDICATOR UNIT REMOVAL/INSTALLATION.)
When not using M-MDS
1. Disconnect the negative battery cable. (See NEGATIVE BATTERY CABLE DISCONNECTION/CONNECTION.)
2. Remove the following parts:a. Selector lever knob (AT) (See AUTOMATIC TRANSMISSION SHIFT MECHANISM REMOVAL/INSTALLATION.)b. Shift lever knob (MT)c. Shift panel component (See SHIFT PANEL REMOVAL/INSTALLATION.)d. Upper panel (See UPPER PANEL REMOVAL/INSTALLATION.)e. Parking brake lever boot panel (See PARKING BRAKE LEVER BOOT PANEL REMOVAL/INSTALLATION.)f. Rear console (See REAR CONSOLE REMOVAL/INSTALLATION.)g. Front console panel (See FRONT CONSOLE PANEL REMOVAL/INSTALLATION.)
3. Remove the indicator unit with the connector still connected. (See INDICATOR UNIT REMOVAL/INSTALLATION.)
4. Connect the negative battery cable. (See NEGATIVE BATTERY CABLE DISCONNECTION/CONNECTION.)
5. Switch the ignition ON (engine off or on).
6. Using a jumper wire, connect indicator unit terminal G and body ground for 5 s or more.
CAUTION:
If the terminals are mistakenly connected, vehicle damage or fire could occur. When connecting with the jumper wire, thoroughly verify what terminals are being connected to prevent a miss-connection.
7. Verify that the warning/indicator lights are displayed as shown in the figure.
< Previous Next >
If the warning/indicator lights are not as shown in the figure, replace the indicator unit. (See INDICATOR UNIT REMOVAL/INSTALLATION.)